Search the Community
Showing results for tags 'gsap'.
-
Hi guys! I'm learning GSAP a few months, with the help of community, this is my first work using GSAP, in progress yet. Thanks all for help! And i have another question, about page transitions, shared element transitions between pages. See website reference at link: https://alfacharlie.co/ See the effect of transitions between pages, the softness the animations. I used the barba.js in html + css and it worked, but not working fine in wordpress, someone to help me achieve page transitions in wordpress site?
-
I want to use this parametric waves animation with gsap.min library, currently this is working with TwinMAX. After removing the gsap.min It's working fine but I cant remove gsap.min because other animations or not working without gsap.min I have getting the following error in console. Uncaught TypeError: Sine.easeInOut.getRatio is not a function https://codepen.io/ThiemelJiri/pen/pWyezW Anyone can help please? Thanks
-
Hello! I am trying to accomplish this effect https://greensock.com/docs/v2/Plugins/DirectionalRotationPlugin on a 3d scene. So basically i want the camera to transition to the point selected and not jump to it as it is right now. How can i do that?
-
Hello , i hope some one can help me , how i can do like this effect in gsap , not latterly same , but i want to open laptop win scroll , is there a way with gsap ? thank you in advance reference :https://www.apple.com/macbook-pro-13/ https://postimg.cc/ftRJTW5M
-
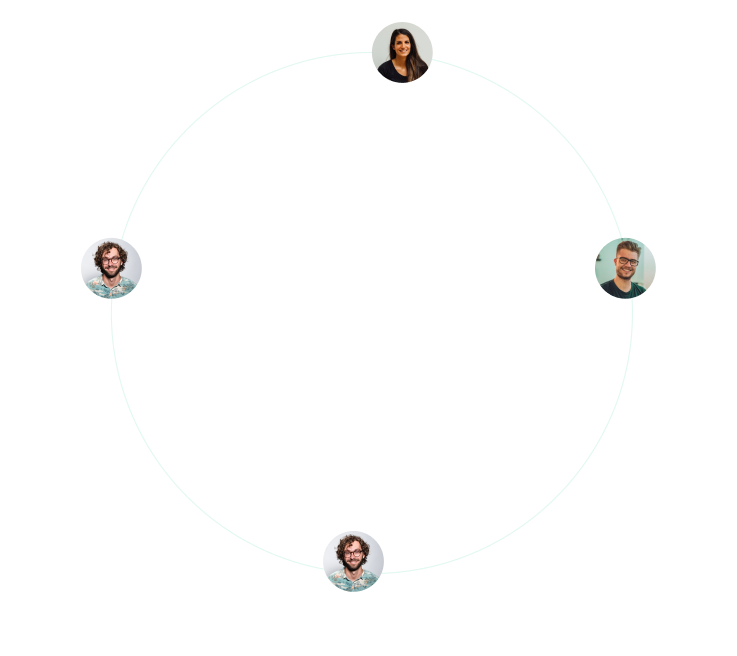
Hello Guys, I am having trouble creating an circular animation with motion path. Basically what I am trying to achieve is that all the 4 images rotate in even manner. for example First image should start from 0%, second from 25%, third from 50% and fourth from 75%. Here is the code sandbox for my code https://codesandbox.io/s/orbit-motion-path-mb6ns?file=/src/App.js:1339-1344 Please see attached screenshot for what I am trying to achieve Please help me. Thanks
-
Hello guys, Im trying to build a simple carousel slider in vue 2. First problem is that my timeline is initially paused (i heard that is a good practice) and if i click next or prev button my animation doesn't play. I found solution, but I don't know if it is right one. I mean, it works but when using prevSlide function animation back to first initial slide. (probably thats another not related problem) So my question is how to handle timelines in vue. Should I put timeline in mounted, and prevSlide and nextSlide functions should only play or reverse the timeline? temporary solution: nextSlide() { this.tl.to(gsap.utils.toArray(this.$refs.slider.children), { xPercent: "-=" + 100, onComplete: this.tl.pause() }); this.tl.play() } the main code: <template> <div id="app"> <div class="slider" ref="slider"> <div class="slide"></div> <div class="slide"></div> <div class="slide"></div> </div> <button @click="prevSlide">prev</button> <button @click="nextSlide">next</button> </div> </template> <script> import gsap from "gsap"; export default { name: "App", data() { return { currSlide: 1, tl: gsap.timeline({ paused: true }), }; }, methods: { nextSlide() { this.tl.to(gsap.utils.toArray(this.$refs.slider.children), { xPercent: "-=" + 100, }); }, prevSlide() { this.tl.to(gsap.utils.toArray(this.$refs.slider.children), { xPercent: "-=" - 100, }); }, }, mounted() {}, }; </script> <style> #app { font-family: "Avenir", Helvetica, Arial, sans-serif; -webkit-font-smoothing: antialiased; -moz-osx-font-smoothing: grayscale; text-align: center; color: #2c3e50; margin-top: 60px; } .slider { width: 600px; height: 350px; display: flex; flex-direction: row; overflow: hidden; } .slide { width: 100%; height: 100%; flex-shrink: 0; } .slide:nth-child(1) { background: crimson; } .slide:nth-child(2) { background: green; } .slide:nth-child(3) { background: darkcyan; } </style> Code playground down below https://codesandbox.io/s/gracious-fog-y4b8d?file=/src/App.vue
-
 React has updated and introduced hooks since this article was written. We recommend reading our updated guide to animating with GSAP in React. This page was also created for GSAP version 2. We have since released GSAP 3 with many improvements. While it is backward compatible with most GSAP 2 features, some parts may need to be updated to work properly. Please see the GSAP 3 release notes for details Preface This guide assumes a basic knowledge of both the GreenSock Animation Platform (GSAP) and React, as well as some common tools used to develop a React app. As GSAP becomes the de-facto standard for creating rich animations and UI's on the web, developers must learn how to integrate it with other tools like React which has become popular because it allows developers to write their apps in a modular, declarative and re-usable fashion. As a moderator in the GreenSock forums, I've noticed that there are a few common hurdles to getting the two working together seamlessly, like referencing the DOM element appropriately, doing things The React Way, etc. which is why I'm writing this article. We won't delve into how a React app should be structured since our focus is on using GSAP, but the techniques used throughout this guide follow the official guidelines and have been reviewed by maintainers of the React Transition Group tool. We'll start simple and get more complex toward the end. How GSAP Works GSAP basically updates numeric properties of an object many times per second which creates the illusion of animation. For DOM elements, GSAP updates the the inline style properties. const myElement = document.getElementById("my-element"); TweenLite.to(myElement, 1, {width: 100, backgroundColor: "red"}); As you can see this means that we need access to the actual DOM node rendered in the document in order to pass it to the TweenLite.to() method. How React Works Explaining how React works is beyond the scope of this article, but let's focus on how React gets the JSX code we write and puts that in the DOM. <div className="my-class"> Some content here </div> With React, we normally don't pass an id attribute to the element because we use a declarative way to access methods, instances, props and state. It's through the component's (or the application's) state that we can change how things are represented in the DOM. There's no direct DOM manipulation, so typically there's no need to actually access the DOM. The React team has given developers ways to access the DOM nodes when needed, and the API changed a bit over the years as React matured. At this time (September, 2018) the latest version of React (16.4.2) allows developers to use Refs to access the DOM nodes. In this guide we'll mainly use the Callback Refs to create a reference to the DOM node and then feed it into GSAP animations because it's much faster for GSAP to directly manipulate properties rather than funneling them through React's state machine. Creating Our First Animation We'll use the ref to access the DOM node and the componentDidMount() lifecycle method of the component to create our first animation, because this will guarantee that the node has been added to the DOM tree and is ready to be passed into a GSAP animation. class MyComponent extends Component { constructor(props){ super(props); // reference to the DOM node this.myElement = null; // reference to the animation this.myTween = null; } componentDidMount(){ // use the node ref to create the animation this.myTween = TweenLite.to(this.myElement, 1, {x: 100, y: 100}); } render(){ return <div ref={div => this.myElement = div} />; } } Not that difficult, right? Let's go through the code so we can understand what is happening. First when we create an instance of this class, two properties are added to it: myElement and myTween, but both are equal to null. Why? Because at this point the node has not been added to the DOM tree and if we try to pass this node to a GSAP animation, we'll get an error indicating that GSAP cannot tween a null target. After the new instance has been initialized, the render() method runs. In the render method we're using the ref attribute that is basically a function that has a single parameter – the DOM node being added to the DOM tree. At this point we update the reference to the DOM node created in the class constructor. After that, this reference is no longer null and can be used anywhere we need it in our component. Finally, the componentDidMount() method runs and updates the reference to myTween with a TweenLite tween whose target is the internal reference to the DOM node that should animate. Simple, elegant and very React-way of us! It is worth mentioning that we could have created a one-run-animation by not creating a reference to the TweenLite tween in the constructor method. We could have just created a tween in the componentDidMount method and it would run immediately, like this: componentDidMount(){ TweenLite.to(this.myElement, 1, {x: 100, y: 100}); } The main benefit of storing a TweenLite tween as a reference in the component, is that this pattern allows us to use any of the methods GSAP has to offer like: play(), pause(), reverse(), restart(), seek(), change the speed (timeScale), etc., to get full control of the animations. Also this approach allows us to create any GSAP animation (TweenLite, TweenMax, TimelineLite, etc.) in the constructor. For example, we could use a timeline in order to create a complex animation: constructor(props){ super(props); this.myElement = null; this.myTween = TimelineLite({paused: true}); } componentDidMount(){ this.myTween .to(this.myElement, 0.5, {x: 100}) .to(this.myElement, 0.5, {y: 100, rotation: 180}) .play(); } With this approach we create a paused Timeline in the constructor and add the individual tweens using the shorthand methods. Since the Timeline was paused initially, we play it after adding all the tweens to it. We could also leave it paused and control it somewhere else in our app. The following example shows this technique: Simple Tween Demo Animating a Group of Elements One of the perks of using React is that allows us to add a group of elements using the array.map() method, which reduces the amount of HTML we have to write. This also can help us when creating an animation for all those elements. Let's say that you want to animate a group of elements onto the screen in a staggered fashion. It's simple: constructor(props){ super(props); this.myTween = new TimelineLite({paused: true}); this.myElements = []; } componentDidMount(){ this.myTween.staggerTo(this.myElements, 0.5, {y: 0, autoAlpha: 1}, 0.1); } render(){ return <div> <ul> {elementsArray.map((element, index) => <li key={element.id} ref={li => this.myElements[index] = li} > {element.name} </li>)} </ul> </div>; } This looks a bit more complex but we're using the same pattern to access each DOM node. The only difference is that instead of using a single reference for each element, we add each element to an array. In the componentDidMount() method we use TimelineLite.staggerTo() and GSAP does its magic to create a staggered animation! Multiple Elements Demo Creating a Complex Sequence We won't always get all the elements in an array so sometimes we might need to create a complex animation using different elements. Just like in the first example we store a reference in the constructor for each element and create our timeline in the componentDidMount() method: Timeline Sequence Demo Note how in this example we use a combination of methods. Most of the elements are stored as an instance property using this.element = null, but also we're adding a group of elements using an array.map(). Instead of using the map() callback to create tweens in the timeline (which is completely possible), we're adding them to an array that is passed in the staggerFrom() method to create the stagger effect. Animating Via State The most commonly used pattern to update a React app is through changing the state of its components. So it's easy to control when and how elements are animated based on the app state. It's not very difficult to listen to state changes and control a GSAP animation depending on state, using the componentDidUpdate() lifecycle method. Basically we compare the value of a state property before the update and after the update, and control the animation accordingly. componentDidUpdate(prevProps, prevState) { if (prevState.play !== this.state.play) { this.myTween.play(); } } Control Through State Demo In this example we compare the value of different state properties (one for each control method implemented in the component) to control the animation as those values are updated. It's important to notice that this example is a bit convoluted for doing something that can be achieved by calling a method directly in an event handler (such as onClick). The main idea is to show the proper way of controlling things through the state. A cleaner and simpler way to control an animation is by passing a prop from a parent component or through an app state store such as Redux or MobX. This modal samples does exactly that: // parent component <ModalComponent visible={this.state.modalVisible} close={this.setModalVisible.bind(null, false)} /> // ModalComponent constructor(props){ super(props); this.modalTween = new TimelineLite({ paused: true }); } componentDidMount() { this.modalTween .to(this.modalWrap, 0.01, { autoAlpha: 1 }) .to(this.modalDialog, 0.25, { y: 50, autoAlpha: 1 }, 0) .reversed(true) .paused(false); } componentDidUpdate(){ this.modalTween.reversed(!this.props.visible); } As you can see the modal animation is controlled by updating the visible prop passed by its parent, as well as a close method passed as a prop. This code is far simpler and reduces the chance of error. State Modal Demo Using React Transition Group React Transition Group(RTG) is a great tool that allows another level of control when animating an element in a React app. This is referred to as the capacity to mount and unmount either the element being animated or an entire component. This might not seem like much when animating a single image or a div, but this could mean a significant performance enhancement in our app in some cases. SIMPLE TRANSITION DEMO In this example the <Transition> component wraps the element we want to animate. This element remains unmounted while it's show prop is false. When the value changes to true, it is mounted and then the animation starts. Then when the prop is set to false again, another animation starts and when this is completed it can also use the <Transition> component to wrap the entire component. RTG also provides the <TransitionGroup> component, which allows us to control a group of <Transition> components, in the same way a single <Transition> component allows to control the mounting and unmounting of a component. This is a good alternative for animating dynamic lists that could have elements added and/or removed, or lists based on data filtering. Transition Group Demo <Transition timeout={1000} mountOnEnter unmountOnExit in={show} addEndListener={(node, done) => { TweenLite.to(node, 0.35, { y: 0, autoAlpha: show ? 1 : 0, onComplete: done, delay: !show ? 0 : card.init ? props.index * 0.15 : 0 }); }} > In this example we use the addEndListener() callback from the <Transition> component. This gives us two parameters, the node element being added in the DOM tree and the done callback, which allows to control the inner state of the <Transition> component as the element is mounted and unmounted. The entire animation is controlled by the in prop, which triggers the addEndListener() and ultimately the animation. You may notice that we're not creating two different animations for the enter/exit state of the component. We create a single animation that uses the same DOM node and the same properties. By doing this, GSAP's overwrite manager kills any existing animation affecting the same element and properties, giving us a seamless transition between the enter and exit animations. Finally, using RTG allows us for a more fine-grained code, because we can use all the event callbacks provided by GSAP (onStart, onUpdate, onComplete, onReverse, onReverseComplete) to run all the code we want, before calling the done callback (is extremely important to notify that the animation has completed). Animating Route Changes Routing is one of the most common scenarios in a React app. Route changes in a React app means that an entirely different view is rendered depending on the path in the browser's address bar which is the most common pattern to render a completely different component in a route change. Obviously animating those changes gives a very professional look and feel to our React apps. Rendering a new component based on a route change means that the component of the previous route is unmounted and the one for the next route is mounted. We already covered animating components animations tied to mount/unmount using the <Transition> component from RTG, so this is a very good option to animate route changes. <BrowserRouter> <div> <Route path="/" exact> { ({ match }) => <Home show={match !== null} /> } </Route> <Route path="/services"> { ({ match }) => <Services show={match !== null} /> } </Route> <Route path="/contact"> { ({ match }) => <Contact show={match !== null} /> } </Route> </div> </BrowserRouter> This main component uses React Router's <BrowserRouter> and <Route> and checks the match object passed as a prop to every <Route> component, while returning the component that should be rendered for each URL. Also we pass the show property to each component, in the same way we did in the transition example. <Transition unmountOnExit in={props.show} timeout={1000} onEnter={node => TweenLite.set(node, startState)} addEndListener={ (node, done) => { TweenLite.to(node, 0.5, { autoAlpha: props.show ? 1 : 0, y: props.show ? 0 : 50, onComplete: done }); }} > As you can see, the code is basically the same used to animate a single component; the only difference is that now we have two animations happening in different components at the same time. Route Animation Demo It's worth noting that the animations used in this example are quite simple but you can use any type of animation even complex, nested animations. As you can see by now, using GSAP and React can play together nicely. With all the tools and plugins GSAP has to offer the sky is the limit for creating compelling and amazing React applications! FAQ What is this "Virtual DOM" thing, that is referred so much when it comes to React Apps? Can GSAP work with this virtual dom? The Virtual DOM is what React uses to update the DOM in a fast and efficient way. In order to learn more about it check this article and the React Docs. GSAP can't work with the virtual DOM because the elements in the Virtual DOM are not exactly DOM nodes per-se. I often read about the declarative nature of React. Does that affect how we use GSAP in a React APP? Yes. React works by updating the rendered DOM through changes in the App state, so when creating an animation using GSAP, instead of reaching out directly to the DOM, like in most other cases, we need to wait for those changes in the app state and the DOM to be rendered, in order to use the current representation of the app state and create the animation. To learn more about how declarative and imperative code work read this article. In the second sample I see this code in the ref callback ref={div => this.cards = div}. Why is the index being used instead of just pushing the element in the array? The reason for that is that every time a React component is re-rendered, the render method is executed, but the original instance remains unchanged. The array used to create the animation is created in the component's constructor. The GSAP animation (a TimelineLite) is created in the componentDidMount hook. These two elements are created just once in the App's lifecycle, while the render method is executed on every re-render. Therefore if we push the elements to the array on every re-render, even though the Timeline instance won't change, the array will get bigger and bigger every time the component is re-rendered. This could cause a memory issue, especially for large collections. In the guide one of the samples triggers animations via the state of a component or the app. Is it possible to update the state of the component/app using GSAP? Absolutely! All you have to do is use one of the many callback events GSAP has to offer. The only precaution is to be aware of infinite loops. That is if an animation is started on the render method of a component and a callback from that animation updates the state of the component then that will trigger a re-render, which will start the animation again. You can check this simple example of how that can be done. Is it possible to trigger a route change using GSAP? It is possible using React Router's API. Although is not recommended because using React Router's API directly will prevent triggering the route change animations when using the browser's back and forward buttons. However, using React Transition Group with GSAP does trigger the route change animations with the native navigation methods. Can I use other GSAP plugins and tools in a React App? This guide shows only TweenMax, Timeline and the CSS Plugin? Yes, any GSAP tool or plugin you want can be used in a React app. Just be sure to follow the same patterns and guidelines from this article and you'll be fine. I tried the code in the guide and samples, but it doesn't work. What can I do? Head to the GreenSock forums where all your questions will be answered as fast as possible. I want to contribute or post an issue to this guide. Where can I do that? Even though this guide was reviewed by GreenSock and React experts, perhaps something might have slipped away, or with time and new versions, some things should or could be done differently. For those cases please head to this GitHub Repo and inform any issues or create a Pull Request with the changes you think should be added. New to GSAP? Check out the Getting Started Guide. Got questions? Head over to the GreenSock forums where there's a fantastic community of animators. Acknowledgments I'd like to thank the three developers that took time from their work and lives to review this guide as well as the samples in it. I couldn't have done this without their help and valuable input. Please be sure to follow them: Xiaoyan Wang: A very talented React developer. While Xiaoyan doesn't have a very active online social life (Twitter, Facebook, etc), you can follow what he does on GitHub. Jason Quense: One of the maintainers of React Transition Group and part of the React Bootstrap Team. Jason also collaborates in many other React-related projects. Check Jason's GitHub profile for more info. Matija Marohnić: The most active contributor and maintainer of React Transition Group and Part of the Yeoman Team. Matija also contributes in a lot of React-related projects as well as many other open source software. Be sure to follow Matija in GitHub and Twitter. A guest post from Rodrigo Hernando, a talented animator/developer who has years of experience solving animation challenges. Rodrigo is a seasoned React developer and he was one of our first moderators, serving the GreenSock community since 2011 with his expert help and friendly charm.
 -
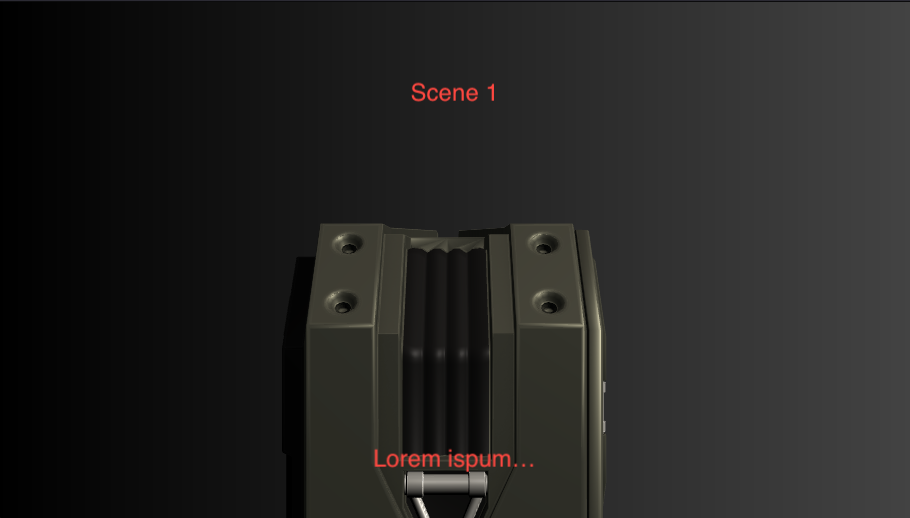
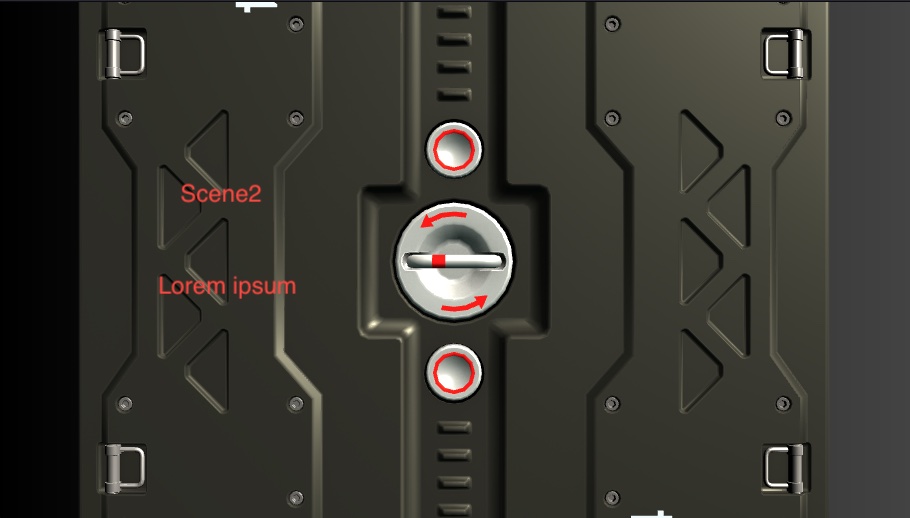
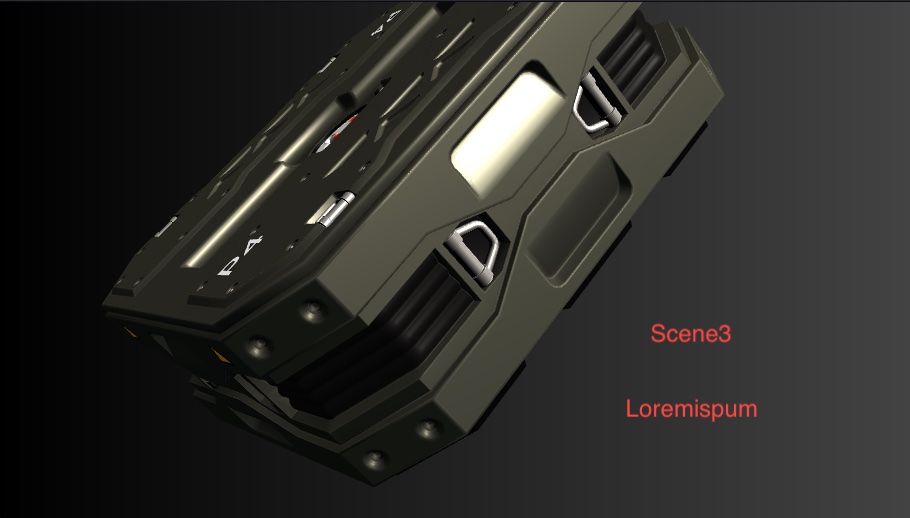
Hello Dear members of this forum can i please ask for a little guidance. I want to combine three.js and gsap/scrollTrigger. My page structure is simple: two sections both with height: 100vh First section is simple hero baner that is not containing any animation (not relevant for the issue) and the second section is a place when magic should happen. I animating three.js model as soon as the second section hits the viewport and I did it by absolute postioning inside relative parent, creating a timeline with all the changes to model (rotation, scale, lighting, camera movment) and connect it all with scroll trigger (using "pin" propery) and this works like charm. Since I cant use codepen i will paste code here (so sorry) js: const timeline = gsap.timeline({ scrollTrigger: { trigger: ".scene-wrapper", start: "top", scrub: 1, pin: true } }); timeline .to(ambientLight, {intensity: 4, duration: 0.4}, 'scene1') .to(mainLight, {intensity: 5, duration: 0.4}, 'scene1') .to(model.rotation, {y: -Math.PI / 2, duration: 4}, 'scene2') .to(model.position, {x: 0, duration: 3}, 'scene2') .to(camera.position, {y: 0, duration: 3}, 'scene2') .to(camera.position, {z: 4, duration: 2.5}, 'scene3') .to(model.rotation, {z: -0.8, duration: 3}, 'scene3') .to(model.rotation, {y: -2.6, duration: 3}, 'scene3') .to(model.rotation, {z: 0, duration: 3}, 'scene4') .to(model.rotation, {y: -3.1, duration: 3}, 'scene4') .to(camera.position, {y: 0.4, duration: 3}, 'scene4') .to(camera.position, {z: 6, duration: 3}, 'scene4') html: <div class="wrapper"> <div class="section one"> <h1>Funny stuff</h1> </div> <div class="section two scene-wrapper"> <div class="background-container"> <div class="animation-container"></div> </div> <div class="scroll-container"> <section class="scene-1 scene"> <div class="copy-wrapper"> <h2 class="headline">This is 3D Model approach</h2> <p class="subtitle">Lorem ipsum dolor sit amet consectetur adipisicing elit</p> </div> </section> <section class="scene-2 scene"> <div class="content-column"> <div class="copy-wrapper"> <h2 class="headline">Scene 2</h2> <p class="subtitle">Lorem ipsum dolor sit amet consectetur adipisicing elit</p> </div> </div> <div class="content-column"> </div> </section> <section class="scene-3 scene"> <div class="copy-wrapper"> <div class="content-column"> </div> <div class="content-column"> <div class="copy-wrapper"> <h2 class="headline">Scene 3</h2> <p class="subtitle">Lorem ipsum dolor sit amet consectetur adipisicing elit</p> </div> </div> </div> </section> <section class="scene-4 scene"> <div class="copy-wrapper"> <h2 class="headline">Scene 4</h2> <p class="subtitle">Lorem ipsum dolor sit amet consectetur adipisicing elit</p> </div> </section> </div> </div> </div> As you can see inside ".scene-wrapper" i have container for aniamtion AND for 4 sections that i called scenes. My model is pined to a container and stays always on top of the screen (thats desired behaviour) but now i want to hide ans show this 4 texts from the "scens" in particular moments of my aniamtion and I dont know how to approach this.... So question to you dear forum: 1. Should I add animations of each text to the created timeline and create even longer timeline that i have right now or create separate timeline for text ? 2. Do I need second scrollTrigger instance just for texts ? To give you an idea what I want to create please see screenshots NOTE: this is free model downloaded from Sketchfab
-
Hi all, Looking for a hand or some advice if possible. I've created this codepen (below) and it works well enough when you drag the content horizontally but I would also like to be able to scroll with the mouse through the content, very much like the functionality of this website - https://antoni.de/cases/ I'm fairly new to Javascript and certainly GSAP, so any input is much appreciated. Thanks Jon
-
I was hoping somebody might be able to help with a little GSAP issue I'm having ? Essentially, on our site we have a 'Menu and Search' button, that when clicked, will animate in the various parts of the full-screen, takeover menu. As well as this, we also have a separate function which deals with toggling a few classes, etc. This function has been assigned to the onStart callback, and also the onReverseCompleted callback, however it appears that on rare occasions (and I can't seem to create a consistent test case for this) that the onStart is running twice, and therefore breaks our animation. Does anybody have any ideas as to why this may be? I've mocked up a sample CodePen with a general gist of our code, except in a more simple context. Any help would be much appreciated. Thanks!
-
Hi, let me start by saying i love gsap and the hard work you guys put in it, since thats out of the way as you can see in my code pen i have two problems i need to solve. 1. When i drag and click on a card before inertia velocity go to zero the cards container animation position rest to x zero break. 2. When a crad onclick happens i want the animation drag to stop and when clicked again or a close button to reverse animation and rest where the card was. I feel am close but i need help ?
-
Hey guys, I'm using SplitText plugin to show like a typing animation, the problem is that sometimes I have buttons inside the paragraph and the plugin is also typing those character when I don't need the text inside the buttons to have that animation. It's there a way to get avoid that text to be splited? I try several techniques, one was to remove the paragraph with the buttons outside of the SplitText animation, the problem there is that I need the movement to the next line
-
 Hello to all. Maybe someone has time to review and correct the script - https://codepen.io/tester_info/pen/JjNJLNV Here is a small problem, it’s incorrect scrolling and changing the directions of the scrolling (from horizontal scrolling to vertical one and vice versa). There are two problems: 1. There is a bug in the scrolling (as I understand it’s because of the vertical block takes height, such as in horizontal). 2. The last section of the "contact block" cannot be scrolled to its full width Maybe we can work differently to perform this task with mix (horizontal/vertical) scrolling sections?
 -

-
HI Guys, I have created 2 boxes(large & small).. And i want to animate those boxes differently in different screen sizes. Here in code pen u can see a demo. Its for the large screen device. Here the small box is showing after the first box appears & then sliding to left. But i want to change the animation for medium or small screens. Like first the large box will appear like it do for large screens and then the small box will appear after a few seconds & then instead of sliding left it will disappear after showing a few seconds. I used matchMedia for making changes. But somehow im unable to get the result i want. Im so confused. I dont know what to do. Can anyone tell me whats the problem in my code.
-
I created a timeline animation which runs on click event. Animations are working smoothly only after few refresh in most of the browsers. Below is my function with timeline.. function exploreTimeline() { gsap.timeline() . to("body", { position: "static", overflow: "auto" }) . to(".intro-content", { duration: 0.3, autoAlpha: 0.01, marginLeft: 50, ease: "power1" }, 0) . to(".intro-content", { duration: 0.8, height: 0, marginBottom: 0, ease: "power2.in" }, 0) . to(".intro-section", { background: "none" }, 0) . to(".globe", { filter: "blur(5px)" }, 0) . to(".magical-slider-container", { duration: 0.8, bottom: "5%", ease: "none", onComplete: () => { ScrollTrigger.refresh(); } }, 0) }
-
 I'm trying to make a simple slider that animates-in then out one slide after the other according to the currentStep variable, which gets incremented by 1 at the end of every slide, but nonetheless , I end up getting the same slide over and over again and can't figure out why...
 -
Hi again all, Supplied a codepen this time. Trying to get the onEnter and onLeave animations to work in a Flip filter animation. But the assets seem to keep popping in and out but only works sometimes. Been trying to debug for a few hours now but think I've hit a wall.
-
Hi, I was trying to created some cool animations using ScrollTrigger, but it doesn't work. The animation plays once the page is loaded. This is my code: I would like to add that thanks to the activity of this forum I could integrate GSAP animations to a child theme on Wordpress.
-
How to make a scrollable sub-section with split screen (product name on the left and its image on the right), just like in the following website. https://katiforner.com/
-
Hello All, I created a Vertically Pinned section with GSAP and scrollTrigger the section link is attached. Basically this is working fine for me but there is a problem. I wants that when I click on a specific anchor then it will scrolled to the specific section I tried different methods but it is not working fine. It will be great if you help me in this case. I'll be thankful.
-
i want paper to go to conus but it moves backwards and i cannot understand how to change it, help please
-
Hello All! I'm trying to recreate this: https://codepen.io/GreenSock/pen/YzyqVNe . But where the left column moves up on scroll then pins, then the right column comes up pins next to it and then scrolls through its content before moving down the page. simliar to this beautiful page: https://oldspitalfieldsmarket.com/ Any advice or guidance would be appreciated!
-
Hello everyone, I would like to develop this kind of animation for my background. Anybody suggest me about this how can I develop this? Also how can I add liquid hover effect on images. https://s.muz.li/NzNjY2YzNGRi Thanks
-
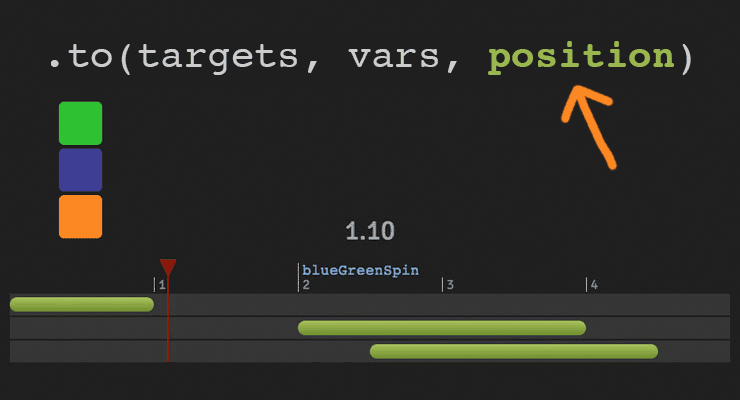 The secret to building gorgeous sequences with precise timing is understanding the position parameter which is used in many methods throughout GSAP. This one super-flexible parameter controls the placement of your tweens, labels, callbacks, pauses, and even nested timelines, so you'll be able to literally place anything anywhere in any sequence. Watch the video For a quick overview of the position parameter, check out this video from the "GSAP 3 Express" course by Snorkl.tv - one of the best ways to learn the basics of GSAP 3. Using position with gsap.to() This article will focus on the gsap.to() method for adding tweens to a Tween, but it works the same in other methods like from(), fromTo(), add(), etc. Notice that the position parameter comes after the vars parameter: .to( target, vars, position ) Since it's so common to chain animations one-after-the-other, the default position is "+=0" which just means "at the end", so timeline.to(...).to(...) chains those animations back-to-back. It's fine to omit the position parameter in this case. But what if you want them to overlap, or start at the same time, or have a gap between them? No problem. Multiple behaviors The position parameter is super flexible, accommodating any of these options: Absolute time (in seconds) measured from the start of the timeline, as a number like 3 // insert exactly 3 seconds from the start of the timeline tl.to(".class", {x: 100}, 3); Label, like "someLabel". If the label doesn't exist, it'll be added to the end of the timeline. // insert at the "someLabel" label tl.to(".class", {x: 100}, "someLabel"); "<" The start of previous animation**. Think of < as a pointer back to the start of the previous animation. // insert at the START of the previous animation tl.to(".class", {x: 100}, "<"); ">" - The end of the previous animation**. Think of > as a pointer to the end of the previous animation. // insert at the END of the previous animation tl.to(".class", {x: 100}, ">"); A complex string where "+=" and "-=" prefixes indicate relative values. When a number follows "<" or ">", it is interpreted as relative so "<2" is the same as "<+=2". Examples: "+=1" - 1 second past the end of the timeline (creates a gap) "-=1" - 1 second before the end of the timeline (overlaps) "myLabel+=2" - 2 seconds past the label "myLabel" "<+=3" - 3 seconds past the start of the previous animation "<3" - same as "<+=3" (see above) ("+=" is implied when following "<" or ">") ">-0.5" - 0.5 seconds before the end of the previous animation. It's like saying "the end of the previous animation plus -0.5" A complex string based on a percentage. When immediately following a "+=" or "-=" prefix, the percentage is based on total duration of the animation being inserted. When immediately following "<" or ">", it's based on the total duration of the previous animation. Note: total duration includes repeats/yoyos. Examples: "-=25%" - overlap with the end of the timeline by 25% of the inserting animation's total duration "+=50%" - beyond the end of the timeline by 50% of the inserting animation's total duration, creating a gap "<25%" - 25% into the previous animation (from its start). Same as ">-75%" which is negative 75% from the end of the previous animation. "<+=25%" - 25% of the inserting animation's total duration past the start of the previous animation. Different than "<25%" whose percentage is based on the previous animation's total duration whereas anything immediately following "+=" or "-=" is based on the inserting animation's total duration. "myLabel+=30%" - 30% of the inserting animation's total duration past the label "myLabel". Basic code usage tl.to(element, 1, {x: 200}) //1 second after end of timeline (gap) .to(element, {duration: 1, y: 200}, "+=1") //0.5 seconds before end of timeline (overlap) .to(element, {duration: 1, rotation: 360}, "-=0.5") //at exactly 6 seconds from the beginning of the timeline .to(element, {duration: 1, scale: 4}, 6); It can also be used to add tweens at labels or relative to labels //add a label named scene1 at an exact time of 2-seconds into the timeline tl.add("scene1", 2) //add tween at scene1 label .to(element, {duration: 4, x: 200}, "scene1") //add tween 3 seconds after scene1 label .to(element, {duration: 1, opacity: 0}, "scene1+=3"); Sometimes technical explanations and code snippets don't do these things justice. Take a look at the interactive examples below. No position: Direct Sequence If no position parameter is provided, all tweens will run in direct succession. .content .demoBody code.prettyprint, .content .demoBody pre.prettyprint { margin:0; } .content .demoBody pre.prettyprint { width:8380px; } .content .demoBody code, .main-content .demoBody code { background-color:transparent; font-size:18px; line-height:22px; } .demoBody { background-color:#1d1d1d; font-family: 'Signika Negative', sans-serif; color:#989898; font-size:16px; width:838px; margin:auto; } .timelineDemo { margin:auto; background-color:#1d1d1d; width:800px; padding:20px 0; } .demoBody h1, .demoBody h2, .demoBody h3 { margin: 10px 0 10px 0; color:#f3f2ef; } .demoBody h1 { font-size:36px; } .demoBody h2 { font-size:18px; font-weight:300; } .demoBody h3 { font-size:24px; } .demoBody p{ line-height:22px; margin-bottom:16px; width:650px; } .timelineDemo .box { width:50px; height:50px; position:relative; border-radius:6px; margin-bottom:4px; } .timelineDemo .green{ background-color:#6fb936; } .timelineDemo .orange { background-color:#f38630; } .timelineDemo .blue { background-color:#338; } .timleineUI-row{ background-color:#2f2f2f; margin:2px 0; padding:4px 0; } .secondMarker { width:155px; border-left: solid 1px #aaa; display:inline-block; position:relative; line-height:16px; font-size:16px; padding-left:4px; color:#777; } .timelineUI-tween{ position:relative; width:160px; height:16px; border-radius:8px; background: #a0bc58; /* Old browsers */ background: -moz-linear-gradient(top, #a0bc58 0%, #66832f 100%); /* FF3.6+ */ background: -webkit-gradient(linear, left top, left bottom, color-stop(0%,#a0bc58), color-stop(100%,#66832f)); /* Chrome,Safari4+ */ background: -webkit-linear-gradient(top, #a0bc58 0%,#66832f 100%); /* Chrome10+,Safari5.1+ */ background: -o-linear-gradient(top, #a0bc58 0%,#66832f 100%); /* Opera 11.10+ */ background: -ms-linear-gradient(top, #a0bc58 0%,#66832f 100%); /* IE10+ */ background: linear-gradient(to bottom, #a0bc58 0%,#66832f 100%); /* W3C */ filter: progid:DXImageTransform.Microsoft.gradient( startColorstr='#a0bc58', endColorstr='#66832f',GradientType=0 ); /* IE6-9 */ } .timelineUI-dragger-track{ position:relative; width:810px; margin-top:20px; } .timelineUI-dragger{ position:absolute; width:10px; height:100px; top:-20px; } .timelineUI-dragger div{ position:relative; width: 0px; height: 0; border-style: solid; border-width: 20px 10px 0 10px; border-color: rgba(255, 0, 0, 0.4) transparent transparent transparent; left:-10px; } .timelineUI-dragger div::after { content:" "; position:absolute; width:1px; height:95px; top:-1px; left:-1px; border-left: solid 2px rgba(255, 0, 0, 0.4); } .timelineUI-dragger div::before { content:" "; position:absolute; width:20px; height:114px; top:-20px; left:-10px; } .timelineUI-time{ position:relative; font-size:30px; text-align:center; } .controls { margin:10px 2px; } .prettyprint { font-size:20px; line-height:24px; } .timelineUI-button { background: #414141; background-image: -webkit-linear-gradient(top, #575757, #414141); background-image: -moz-linear-gradient(top, #575757, #414141); background-image: -ms-linear-gradient(top, #575757, #414141); background-image: -o-linear-gradient(top, #575757, #414141); background-image: linear-gradient(to bottom, #575757, #414141); text-shadow: 0px 1px 0px #414141; -webkit-box-shadow: 0px 1px 0px 414141; -moz-box-shadow: 0px 1px 0px 414141; box-shadow: 0px 1px 0px 414141; color: #ffffff; text-decoration: none; margin: 0 auto; -webkit-border-radius: 4; -moz-border-radius: 4; border-radius: 4px; font-family: "Signika Negative", sans-serif; text-transform: uppercase; font-weight: 600; display: table; cursor: pointer; font-size: 13px; line-height: 18px; outline:none; border:none; display:inline-block; padding: 8px 14px;} .timelineUI-button:hover { background: #57a818; background-image: -webkit-linear-gradient(top, #57a818, #4d9916); background-image: -moz-linear-gradient(top, #57a818, #4d9916); background-image: -ms-linear-gradient(top, #57a818, #4d9916); background-image: -o-linear-gradient(top, #57a818, #4d9916); background-image: linear-gradient(to bottom, #57a818, #4d9916); text-shadow: 0px 1px 0px #32610e; -webkit-box-shadow: 0px 1px 0px fefefe; -moz-box-shadow: 0px 1px 0px fefefe; box-shadow: 0px 1px 0px fefefe; color: #ffffff; text-decoration: none; } .element-box { background: #ffffff; border-radius: 6px; border: 1px solid #cccccc; padding: 17px 26px 17px 26px; font-weight: 400; font-size: 18px; color: #555555; margin-bottom:20px; } .demoBody .prettyprint { min-width:300px; } Percentage-based values As of GSAP 3.7.0, you can use percentage-based values, as explained in this video: Interactive Demo See the Pen Position Parameter Interactive Demo by GreenSock (@GreenSock) on CodePen. Hopefully by now you can see the true power and flexibility of the position parameter. And again, even though these examples focused mostly on timeline.to(), it works exactly the same way in timeline.from(), timeline.fromTo(), timeline.add(), timeline.call(), and timeline.addPause(). *Percentage-based values were added in GSAP 3.7.0 **The "previous animation" refers to the most recently-inserted animation, not necessarily the animation that is closest to the end of the timeline.
- 6 comments
-
- 4
-

-

-
- gsap
- position parameter
- (and 9 more)