
Search the Community
Showing results for tags 'guest posts'.
Found 2 results
-

Getting Started: GSAP Animations triggered by ScrollMagic
PointC posted a blog post in Learning Center
 Note: This page was created before ScrollTrigger was released. We highly recommend using ScrollTrigger instead of ScrollMagic. This is a guest post from one of our top moderators, Craig Roblewsky (known as PointC), whose "zero-to-hero" story became one of the most popular posts in the forums. His animation skills are also showcased in the "What is GSAP?" video on our home page which he created. He certainly has a knack for helping people understand challenging concepts in a concise way, as you'll see below. Preface ScrollMagic is not a GreenSock product nor is it officially supported here, but GSAP and ScrollMagic work well together, so many questions about it are asked on the GreenSock forums. This article will not be an extensive guide to using ScrollMagic or GSAP, but rather a quick primer to using GSAP and ScrollMagic together. Demos There are eight demos which can be forked as a starting point for your projects. They represent the most common types of scroll triggered animations. It is assumed that you understand the basics of GSAP and ScrollMagic. I won’t be going into detail about the code in each demo, but simply highlighting the most important aspect of each one. I’ve made them with just a few <divs> or <sections> so they’ll be easy to understand and/or reverse engineer. Scripts The first thing to know is which scripts are necessary. For starters, you’ll need the GSAP files. I recommend TweenMax. <script src="https://cdnjs.cloudflare.com/ajax/libs/gsap/2.1.3/TweenMax.min.js"></script> Using ScrollMagic requires the main script. <script src="https://cdnjs.cloudflare.com/ajax/libs/ScrollMagic/2.0.7/ScrollMagic.min.js"></script> To allow ScrollMagic to take control of your tweens, you will also need the GSAP plugin. <script src="https://cdnjs.cloudflare.com/ajax/libs/ScrollMagic/2.0.7/plugins/animation.gsap.min.js"></script> Finally, for debugging purposes, I highly recommend the addIndicators plugin. <script src="https://cdnjs.cloudflare.com/ajax/libs/ScrollMagic/2.0.7/plugins/debug.addIndicators.min.js"></script> Please note: it is important to load TweenMax before loading the animation.gsap script. If you try to use the setTween() method and do not have the animation.gsap script loaded, you will see an error in the console. The following demo is an empty shell which loads all the above scripts and jQuery. Demo 1: GSAP, ScrollMagic and jQuery Empty Starter See the Pen GSAP, ScrollMagic and jQuery Empty Starter by PointC (@PointC) on CodePen. Duration You have two choices when using GSAP tweens with ScrollMagic. You can either use the actual tween duration which then plays the animation at normal speed when you hit the trigger or you can allow ScrollMagic to hijack the duration and the tween will be played as you scroll. To use the actual tween duration, you simply omit the duration from the scene parameters. Demo 2: GSAP and ScrollMagic w/tween duration See the Pen GSAP and ScrollMagic w/tween duration by PointC (@PointC) on CodePen. If you'd like the animation to play as the user scrolls, you can add a duration in pixels or percentage to the scene parameters. This is the same demo, but the scene duration is now set to 50%. When hijacking the duration, I’d recommend changing the default ease to Linear.easeNone. Demo 3: GSAP and ScrollMagic w/scene duration See the Pen GSAP and ScrollMagic w/scene duration by PointC (@PointC) on CodePen. Looping to create scenes A common question many users have is how to create the same animation for multiple elements without manually creating a tween and scene for each one. The easy approach in these situations is to use a jQuery each() loop. If you aren’t using jQuery, a vanilla JS loop can be used too. Demo 4: GSAP and ScrollMagic jQuery each() loop See the Pen Looping to create scenes by PointC (@PointC) on CodePen. Pinning Another common animation is pinning an element, playing a tween or timeline and then unpinning. The biggest thing to remember is create a parent container for the actual pinned section. The animation then plays inside that element while it’s pinned. Quite often users will try to pin the sections that are animating and that will not give you the desired results. Demo 5: GSAP and ScrollMagic Pinning See the Pen GSAP and ScrollMagic Pinning by PointC (@PointC) on CodePen. Horizontal Scrolling This can be achieved by animating the xPercent of a parent element containing the sections in your series of slides. Note the duration is 100% * the number of (panels -1). This example has five slides so the duration is set to 400% and each panel move is 20%. This timeline is manually created but could also be created in a loop. Also note the sections themselves are not animating here. The parent container is the only element that is moving. Demo 6: GSAP and ScrollMagic Horizontal Scrolling See the Pen GSAP and ScrollMagic Horizontal Scrolling by PointC (@PointC) on CodePen. Horizontal Pinning A similar effect to horizontal scrolling is a horizontal pinning. Here we have a main pin scene to hold the parent element in a pinned position. Again, the duration is 100% * the number of (panels -1). In this case that is 500%. The first loop creates an animation for each section to move into place with xPercent:100. Using the position parameter offsets each section by an additional second. That space allows the individual animations to play. This first timeline plays in the main scene with the setPin(). The jQuery each() loop creates a simple SplitText animation for each section. Notice the trigger element is always the #pinMaster div. The trick is adding an offset for each section. The index of the loop is used to multiply by the offset variable which in this case is set to window.innerHeight. Learn more about the SplitText plugin. Demo 7: GSAP and ScrollMagic Horizontal Pin, Tweens and jQuery Loop See the Pen GSAP and ScrollMagic Horizontal Pin and Tweens and jQuery Loop by PointC (@PointC) on CodePen. Scroll w/Parallax Finally, it is possible to achieve a neat little parallax effect as you scroll. In the following demo I’ve used a wrapper class with a child and parent div for illustration purposes. Setting the child element to the right and bottom of the parent allows for animating the div up slightly as the user scrolls. The duration in this case is set to 100% but you can certainly set that to your liking. Demo 8: GSAP and Parallax ScrollMagic See the Pen GSAP and Parallax ScrollMagic by PointC (@PointC) on CodePen. Conclusion As I mentioned at the beginning of this article, ScrollMagic is not a GreenSock product nor is it officially supported here on the GreenSock website or forum. But the GreenSock community likes to help everyone so hopefully the demos will serve as a springboard for your scroll triggered projects and a learning resource as you start using GSAP with ScrollMagic. You can also view the entire demo collection here. New to GSAP? Check out the Getting Started Guide. Got questions? Head over to the GreenSock forums where there's a fantastic community of animators. Need additional details about ScrollMagic? Check out the ScrollMagic docs.
 -
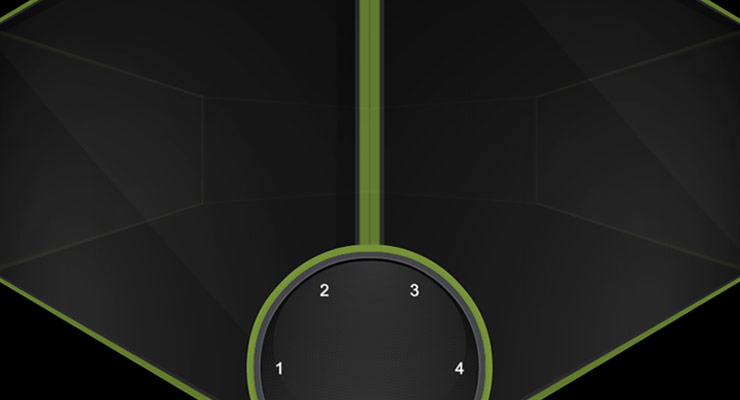 Note: This page was created for GSAP version 2. We have since released GSAP 3 with many improvements. While it is backward compatible with most GSAP 2 features, some parts may need to be updated to work properly. Please see the GSAP 3 release notes for details. The following is a guest post by Chris Gannon. Chris is the leading authority on using GSAP with Edge Animate. A veteran of the Flash world, Chris has been applying his animation and design skills to many cutting-edge HTML5 projects. We asked Chris to explain to our audience some of the techniques that he uses in his client work and top-selling components on CodeCanyon.net. The concepts he describes have many practical applications and can serve to radically transform how you approach complex projects. Be sure to explore the demos and study the source code. This is not intended to be a step-by-step tutorial. .wide .content p { font-size:20px; } I love 3D stuff and I'm always trying out interesting ways to add depth to my projects. In this article I'll talk about how the CubeDial below was made, the concepts surrounding its underlying mechanism and how some of the solutions I employ overcome some common issues. Ok, so let's get going. Explore the CubeDial demo In the demo below, spin the dial. Notice that spinning the dial spins the cube. You can also swipe the cube and the dial will spin. Both the cube and the dial spin using momentum-based physics. If you are really clever, you may notice that the cube isn't really a cube, as it has 6 front-facing sides. See the Pen Gannon - Cube / Dial by GreenSock (@GreenSock) on CodePen. What's it using under the hood? The core functionality is handled by the GreenSock Animation Platform (GSAP). I always load TweenMax because it includes all the things I need in one script load: TweenLite, CSSPlugin, EasePack, timeline sequencing tools, etc. I use TweenMax all over the place not only to immediately set CSS properties (using TweenMax.set() but also to delay the setting of them, to tween them, and to trigger events not only when they start or stop but crucially whilst they're animating too. Next up is Draggable - a very useful and flexible utility that I use in practically all of my projects now as most UIs need something dragged or moved. Finally we add in ThrowPropsPlugin (and couple it up to Draggable) for that flick/throw/physics/inertia that we have all become so used to on our mobile devices. So the three main GreenSock tools I will be using are: Draggable, TweenMax and ThrowPropsPlugin. The Cube's Structure A lot of you reading this will be visually led developers so below is a diagram of what's going on with the cube (ok it's a hexahedron I think as it has 6 sides). Each face of the 3D object is a <div> with a background image. Each <div> has its Z transformOrigin point set a fair bit away from the actual face (behind it) so that when its rotationY is animated it pivots left to right in perspective. This diagram illustrates the 6 faces - their transformOrigin X and Y are simply set to the middle of the faces (50% 50%) but the crucial part is the transformOrigin Z position which is -200px. In the actual code I dynamically work out what that distance should be based on the number of faces but to keep the diagram simple, I use -200px. The dotted center is that value (-200px) and once that's set each face will appear to swing around a point 200px behind itself when you tween its rotationY. By spinning each face around the same point, we achieve the illusion of the entire cube spinning around its center. To programmatically figure out the rotational offset of each face I use this equation: rotationY: (360/numFaces) * i; What wizardry is used to make a 6-sided object look like a cube? There's a simple answer to this and to demonstrate what's going on I have coded it so that all the faces become slightly transparent when you drag the cube. Try dragging and then holding it halfway through a drag - you'll see the other faces are distorted behind (see sceenshot on left). That's because the transformPerspective on each face is set fairly low (meaning exaggerated) in order to 'bend' the other faces behind. I've also added a slider to help illustrate this in the demo at the top of the page. As you drag the slider, the faces' transformPerspective is set higher and higher to the point where if the slider is fully to the right the perspective is so flat that the cube looks more like an infinite slide show. Try dragging it halfway then spinning the dial or the cube. Creating the dial In simple terms, the dial is just a png with some divs with some numbers in them. I do a little loop based on the number of sides in the cube to generate those divs and position them over the dial image. To make the dial "spin-able" literally takes one line of code using GSAP's Draggable. myDialDraggable = Draggable.create(dial, { type:'rotation', throwProps:true // for momentum-based animation }) That's really all you need to spin something. Amazing. However, the dial I use for this project is a little more advanced. I've isolated some of the dial's code in the demo below. Take note of how the numbers stay vertically oriented as the dial spins. Spin the dial See the Pen Gannon - Dial Only by GreenSock (@GreenSock) on CodePen. Using this method keeps everything in sync and it allows for multiple UI inputs - the null object is always controlled by user interaction and its X position is used to determine the rotation value of the dial (if the cube is dragged) and rotationY value(s) of the faces (if the dial is dragged). You can also use it to work out which face is at the front and because Draggable has the brilliant snap function you can ensure that when you release your drag/throw on either the 3D element or the dial it will always animate the null (and consequently all dependent objects) to a position where a face is flat on. Once it's come to rest you can also fire an onComplete event and have something happen - you might want the active/front face to load an iframe or animate its content. Or maybe you'd like a sound to play or you might want to perform a calculation based on the X position of null. Examples of using onComplete to trigger an animation when the spin is complete can be seen in demos for EdgeRotater and EdgeDial. Interacting with the 3D cube Unlike the simplified 2D demo above, grabbing and throwing the cube is a little more involved. The secret here is that you aren't directly touching the cube at all. In fact it would be literally impossible to effectively drag the cube by a face as the face would eventually disappear in to the distance of 3D space and overlap with other faces. It would be extremely difficult to assess which face receives the touch / mouse input for dragging. To solve this issue a Draggable instance is created that has the null object as its target and uses the <div> that contains the faces of the cube as its trigger. In simple terms this means that any time you click and drag on the div containing the cube it controls the x position of the null object, which in turn sets the rotation of each face of the cube and the rotation of the dial. Its sort of like interacting with a touch screen. There is a piece of glass between you and the UI elements you tap. Where you tap on the screen dictates which UI elements respond to your input. In the CubeDial, the div that contains the cube is like the glass screen of your phone. As you move your finger over the container, the app tracks your motion and applies the new values to the null object. Wrap up Ok that's enough of the complexities - it's hopefully not that complicated when you play around with it and adjust some values and see how things react. And if you're not already familiar with this kind of mechanism, once you've got your head around it you'll probably find you use it everywhere as it can be applied in pretty much all of your interactive projects. So that's all for now - I hope you found some (if not all) of this article interesting and/or informative. Admittedly it introduces the concept of null objects using a fairly complex example but it really doesn't have to be complex (or 3D). The 2D null object demo above might be a great place to start if all of this is pretty new to you as it uses a null object at its most basic level. Dive into the entire source code of the CubeDial Demo. My first draft of this article was peppered with gushing compliments regarding GSAP and I was told to tone it down a bit and maybe leave them until the end. So here it is (it's toned down a bit because I'm quite an excitable person!). GSAP rocks my world and the world of all my clients. If you aren't using it yet you are potentially missing out on one of the best (if not the best) animation platforms for JavaScript/CSS3. Its flexibility, ease of use and performance is light years ahead of anything else and if you're not using it and are curious then I heartily recommend you dive in and see for yourself. Jack has created amazing tools for designers and developers like us and Carl does an extraordinary job of explaining how they work in a simple, relevant and, most importantly, usable way. Happy tweening!