
Acccent
Content Type
Profiles
Forums
Store
Blog
Product
Showcase
FAQ
Downloads
Everything posted by Acccent
-
This happens because you are changing the padding, so GSAP animates the element to its new padding based on the size of the inner box before it started animating. If you remove the padding rules from the CSS, you'll see that the container box animates adequately. If you'd still like to keep the padding, I guess you could specify the height either with CSS or JS, maybe by calculating it on the fly?
-
Okay, I think you lost me there. The examples I gave in my previous post were for the initial positioning, not for the rotations. You didn't change your positioning code in the first codepen... In the second one, I don't know, you're doing a whole lot of new stuff that I don't know about, but on the other hand it seems to be working? So I'm not sure what the problem is...? (It doesn't help that you keep a lot of unused code in your examples and name functions "makeTTL", "makeTLnew", "makeTRnew1"... it's not very readable for someone else, and it might also lead you to make mistakes inadvertently...) To be honest, I think maybe it would be wiser for you to go for a simpler concept for now. What you're trying to achieve is doable, but it will require a lot of trial-and-error and head-scratching, even for someone who's experienced in working with GSAP or making games – here the challenge is not knowing the tools but finding a logical and reliable way to use them. If you want to persevere on this, go for it, and I can provide more help and advice, but at this point I'm not sure what more I can say next to help you out; you know how to use GSAP, now you need to figure out the maths, and I don't have the time or energy to do that for you. (Unless you can compensate me for it.)
-
Like I said above, you actually can't position A by rotating it at the start, because then when you want to rotate it again you'll need to change its transform origin and that will mess its positioning. So you have to position it using translation. Basically, think of it this way: you have 2 sets of 4 balls. B/I/G/E that can just be rotated at the start, with their transform origin still at -100% 0%. And A/J/H/F, that first need to be translated up, and can then be rotated with a transform origin of -100% 100%. let la = S('.LA')[0], lf = S('.LF')[0], lh = S('.LH')[0], lJ = S('.LJ')[0]; TweenLite.set([la, lf, lh, lj], {y: -100, transformOrigin: '-100% 100%'}); TweenLite.set(lf, {rotation: 90}); TweenLite.set(lh, {rotation: 180}); TweenLite.set(lj, {rotation: 270}); (also note how I'm saving the references first, then using those in the tweens – better than using Sizzle or jQuery or whatever to find an element every time.) After you've done that there's still a problem. (I'm only looking at the makeTLnew function here, right?) You're changing the transform origins of the elements, which is the right thing to do, but you're not changing them to the right values: // LB, LE, LI and LG were not translated at the start, so we want them to rotate around the point at the top and to the left TweenMax.set([lb, le, li, lg], {transformOrigin: '-100% 0%'}); // We want LA, LF, LH and LJ to rotate around the point that is at the bottom, to the left (because we translated them at the start) TweenMax.set([la, lf, lh, lj], {transformOrigin: '-100% 100%'}); When you've done that, the "1" rotation should work. You need to apply the same logic to all the rotations. And then you'll need to find a way to save some information about the balls to make sure you rotate the right ones and in the right direction every time, not just just the first time.
-
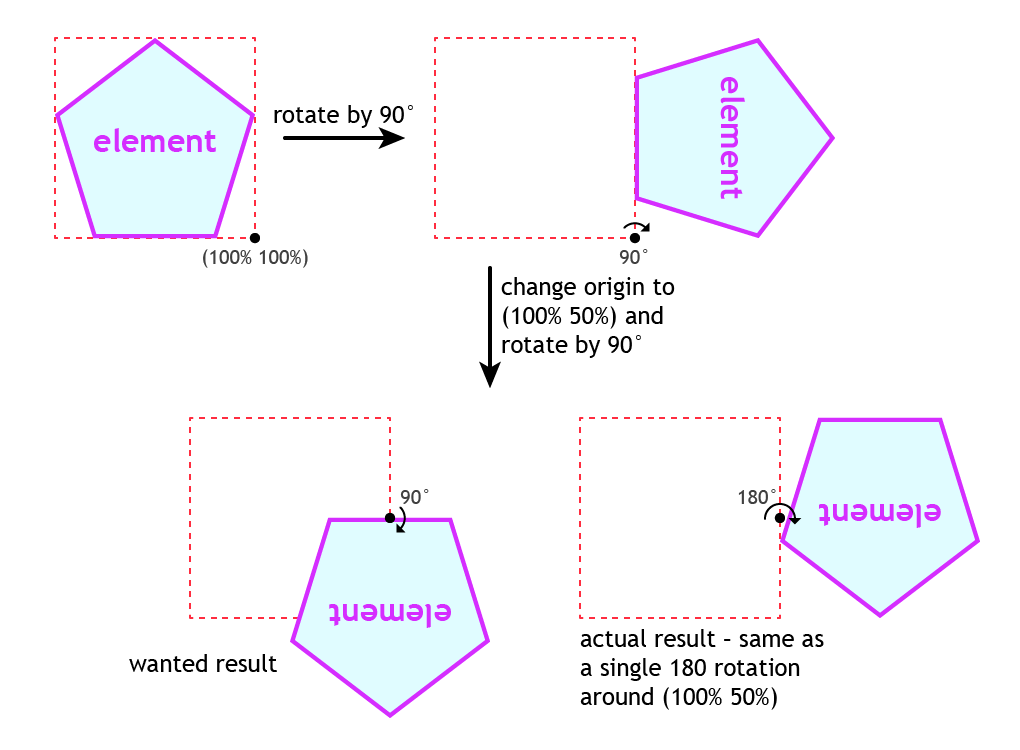
Ok so first of all, I need to correct two things I said above which were not quite correct, so my apologies for that: transformOrigin: 50% 0% is the top of the element and 50% 100% is the bottom. So in your codepen that was the first thing that needed to be changed. you actually can't rotate something by 90°, then change its transform origin to something else and rotate it again. I mean, you can, but if you do it will act as if it was all just one rotation using the latest transform origin. I made a small graphic to explain, attached. That means we need to find another way to position E below F – fortunately we can just translate it. Here is a fork of your codepen with those changes. You're on the right track

-
So I had some free time on my hands (this is a lie but let's pretend) and made a small demo to highlight the differences between Expo, ExpoScale and Linear: It's interesting to see that while ExpoScaleEase is what produces the best feeling of linearity, Expo is what actually mimics the scaling of an object getting closer. (Linear is good for nothing at all.) edit: actually this isn't quite right, I'm not sure what would be a better simulation! new edit: I made a custom ease that gets close, not sure how mathematically accurate and contextual it is though! (by the way, for some reason the code that is meant to update the tween of the side-view sphere when the window is resized doesn't work and I don't understand why... I'm not asking for help with this, but if someone spots what's wrong right away, please let me know )
-
Nice job figuring it out I don't know what your project looks like, but I feel like you could just have two separate timelines, and give paused: true to the second one. But maybe it's easier for you to have everything in only one timeline!
-
For E, F, G, H, I and J you need to change the transformOrigin parameter so that it is at the center of the other circle. Here are a few examples: If you set transformOrigin to 50% 50%, that is the center of the element itself. If you then rotate the element it will rotate around its center, i.e stay in the same position. If you set tO to 100% 100%, that is the bottom-right corner (100% of the element's width, 100% of its height). If you rotate it by 90°, it will move around its bottom-right corner, so it will end up at a position that is below and to the right of where it was initially. If you set tO to -200% 50%, that's a point that is very much to the left of the element (2 times its width to the left), but aligned with the element vertically (half its height). If you rotate it by 90°, it will end up way below and way to the left. You should try making a codepen and applying these transforms to an element via CSS, to see how they work. When you understand this correctly, you can deduce what values to use for your project. Going back to the solution above, if we take A as a starting position, the transform origin for the small circle is 100% 100% because the center of the circle is on the bottom right corner of A. The transform origin for the big circle is something like -200% 100%, ie. way to the left of A and aligned with its bottom side. In your code example, it didn't work because you kept all the transform origins at 100% 0%.
-
Hi harp, https://greensock.com/docs/TimelineMax/addLabel() should help you with this (just .add() would also work if you prefer that!)
-
Always a good idea to check this pinned thread with lots of great tips about working with SVG
-
I can't change my codepen, sorry! The core of the solution is that every element is initially created at its "center" position (where the ball D is at the start). Then the JS code rotates everything immediately so it appears like it's all properly positioned. The reason for that is so that we have a convenient and identical reference position for everything, which we can then use for all the transforms. Does that make sense? (Again, do say if anything at all is unclear. If you are not sure, it could help to read up on how CSS transforms, and particularly transform-origin, work.) In your example with the 10 balls, it is a bit trickier because there is no universal "center" position – it would be between A and B. But the logic is the same: you need to find a position from which to instantiate everything. I would say in your case it could be where A is. So you would have all 10 balls on top of each other on the A position. You make all of their transform-origins (100% 0%) (100% 100%), which is the bottom-right corner (= the center of the small circle). Then you would need to actually move them from there: so you rotate D by 90°, C by 180° and B by 270° (or -90°). At this point A, B, C and D are correct. Then you need to place the balls for the big circle: first you rotate E by -90° so that it's just below F, do the same with G so that it's below H, and with I so it's below J. (Just to be clear: at this stage, A, F, H and J are in the same spot, and B, E, G and I are also in the same spot just below A/F/H/J.) Then you change the transform-origin of F, E, G, H, I and J to (-200% 0%) (-200% 100%), the center of the big circle, and now you can rotate F and E by -90°, G and H by 180° and I and J by 90°. Now you've placed everything and they all have the same initial reference position from which you can more easily work. When you want to rotate the big circle you make sure that whatever's in the A and B position has its transform-origin set to (-200% 100%), and you rotate all 8 balls by either 90° or -90°. When you want to rotate the small circle, then you change the transform-origin of the 2 balls in the center to (100% 100%) and rotate all 4 balls by 90° or -90°. Try that out and let me know how it goes. Feel free to ask if you need more clarifications.
-
Hi harp, I'm not entirely sure what you mean by functional programming (especially in the context of making GSAP animations), but maybe this article here will be useful, and especially the part that I'm linking directly: https://css-tricks.com/writing-smarter-animation-code/#article-header-id-5
-
Also, the codepen I provided above already had that functionality. I changed a couple values (the transform-origins of the elements on the left) and now it has two circles of different sizes. @lisartur I'll help you understand the logic of the codepen if you'd like, but as @GreenSock said I won't be able to provide more code examples. Hopefully once you understand how the code works you'll be able to expand it further to add the extra functionality you need. Please first try to read and understand what I posted and if you need guidance to understand specific points you can ask here. (Unless Jack would rather this moves to PMs – I'm fine with either.)
-
Here's a demo should be fairly easy to then add tweens when hovering each individual sphere.
-
I was going to say, because babacar will need to iterate over every picture anyway to add the scale animation. However one other thing I forgot about is that the whole group must stop moving when hovering over any of the element. It would be annoying to have to pause all of the individual tweens... So, I think there should probably be a combination of both, maybe with the two timelines idea I mentioned above. I'll make a quick demo.
-
I still think that just animating each picture individually is a better approach in this case
-
Hi lisartur, First of all, let me just say that I'll just stop replying to this thread if you keep sending private messages or profile status about it. Now, with regards to your project, you added a whole lot of stuff to my codepen and made it more complicated than it should be. I understand that english isn't your first language (it isn't mine either) so I can totally take the time to explain things you don't understand I would rather take the time to answer how and why my codepen above works, than fixing one of yours. Once you have something working with divs, it will be easy to switch to SVGs. If you go back to my codepen, do you understand everything about it, or is there anything that needs more explanations? (Don't hesitate to ask! it's better to clarify things early than to be afraid to say anything)
-
Hey @Visual-Q, in case you want to put more work into this, I noticed that if you click on a new panel while another one is closing, you end up with the old panel still visible even with the new one fully expanded (•ิ_•ิ)? hehe
-
Vivaldi users need to visit USA gov websites more :< obviously this is not representative of the actual 78% market share
-
Hi babacar, I think for your project you should probably be using individual tweens for each picture, not a single timeline. This is because a single timeline will basically work on all of the pictures as if they were a single block, so it would need to finish animating the very last picture before it starts again with the first one. You could also have two overlapping timelines, with the second one starting before the first one ended, but that's probably going to lead to headaches. So, You should probably try making a simple tween that animates one picture from the right to the left, and then use a for() loop to apply the same logic to all of your pictures; for each of them you would add a delay to the tween so that they don't all start at the same time. (This will also probably make it easier to scale them on mouseover later on as well.)
-
Of course, no worries! I also don't have the time to rework the demo right now, but for future reference I'm sure it would work with labels. In case someone else stumbles on this thread with fewer time constraints
-
You could also have a tween that just increases the value to the next step only, and then have an onComplete callback that both outputs the new value and restarts the tween... although maybe that's a bit convoluted.
-
In addition to what was said above, do note how Shaun chained the .to() methods; also, the second tween has a relative delay of "-=2" but the first tween has a duration of only 1, so the 2nd tween will actually play first. Might be a bit counter-intuitive and lead to mistakes later on! (This post brought to you by someone who was making a codepen and finished it only to come back to the thread to find all the answers posted already)
-
For simple issues such as this, which take a disproportionate amount of time to fix for people who didn't write the code, it can be a good idea to use tools like jslint.com or jshint.com, or any other JS validator, which can help you find the problem yourself.
-
haha! after seeing this thread several times I finally decided to give it a go, but just when I was this close to finishing a codepen I had to leave to go see friends, and I spent the night with my fingers crossed that it wouldn't all be for naught! luckily no one showed up with a groundbreaking solution so I am now free to post mine without fear of ridicule. (of course I would still have posted it regardless, haha.) This uses the 'master timeline' approach highlighted earlier in the thread, but it skips a lot of things by assuming that all the steps will be equally spaced which allowed me to just use tl.time() to see what state the animation currently is in. I'm sure it could easily be reproduced with labels and .getLabelTime(), though. Ideally, you would add a delay before resetting the timescale, so that if I press → 0.1s after the animation reached its end it still skips ahead at the same speed instead of reverting to the default. One area where someone more knowledgeable than me could help is, I'm not sure sub.pause().kill(); sub = null; is necessary or if it's overkill when we want to make sure that tween is properly removed from existence. Maybe it'd be possible to use a different method to see if the tween is active and then use something like .updateTo() to change the target state.
-
Hi Daniel, great website As usual, it would be easier to find out exactly what's happening with a reduced test case. If you could create a small codepen using the React Spark Scroll library and GSAP to animate opacity of just one element on scroll, it would make it way easier to help you out. As it stands, I believe there isn't even a way to see the code you're using unminified, so it's quite impossible to find out where the issue comes from.